Exposing YAMS to the Internet
Making YAMS Available from Anywhere 🌐
Want to access your YAMS server while you’re away from home? Maybe stream your movies during a business trip or let family members access your media server from their own homes? This guide covers your options - but first, let’s talk about why this is tricky! 🤔
⚠️ Important Security Warning
Exposing any server to the internet is inherently risky! Your YAMS installation contains powerful tools that could be misused if compromised. Before proceeding, understand that you’re taking responsibility for:
- Potential security vulnerabilities in the services
- Keeping all components updated and patched
- Monitoring for suspicious activity
- Understanding that your server could become a target
We strongly recommend against exposing YAMS directly to the internet without proper security measures.
Why This is Complicated 🧩
Making your local server accessible from the internet involves several challenges:
- Dynamic IP Addresses: Most home internet connections have changing IP addresses
- Router Configuration: You need to configure port forwarding on your router
- Security: Every open port is a potential entry point for attackers
- Domain Names: You’ll probably want a friendly domain name instead of remembering IP addresses
- SSL/TLS: Modern browsers expect encrypted connections (HTTPS)
Your Options 🛠️
Option 1: Free DNS Services
If you have a static IP or want to deal with dynamic DNS, you’ll need a way to map a domain name to your IP address.
Check out this comprehensive list of free DNS services: Awesome DNS - Free DNS Services
Option 2: Tunneling Solutions
These services create secure tunnels from your local server to the internet, often without requiring router configuration.
Explore various tunneling and VPN solutions here: Awesome Tunneling
Popular options include:
- Cloudflare Tunnels (free tier available)
- Tailscale (great for private access)
- Ngrok (good for development/testing)
- WireGuard VPN (self-hosted option)
Alternative Approaches 💡
Before exposing YAMS to the internet, consider these safer alternatives:
1. VPN-Only Access
Set up a VPN server (like WireGuard) and connect to your home network remotely. This keeps your media server completely private while still allowing remote access.
2. Sync for Offline Viewing
Download content to your devices for offline viewing when you’re away from home.
Best Practices if You Proceed 🛡️
If you decide to expose YAMS to the internet despite the risks:
- Use HTTPS: Never expose services over plain HTTP
- Strong Authentication: Enable strong passwords and consider 2FA where available
- Limit Exposure: Only expose the services you actually need (usually just your media server)
- Regular Updates: Keep all components updated
- Monitor Logs: Watch for suspicious activity
- Backup Everything: Regular backups become even more critical
- Consider a Reverse Proxy: Use something like Nginx Proxy Manager to add an extra security layer
Final Thoughts 🎯
While it’s technically possible to expose YAMS to the internet, it’s a complex topic that requires careful planning and ongoing maintenance. The security implications are significant, and the setup can be challenging even for experienced users.
For most people, we recommend sticking with local network access or using a VPN solution for remote access. It’s simpler, safer, and often just as effective for typical use cases.
What I’m Running 🔧
People often ask me how I handle remote access for my own YAMS setup. Here’s my hybrid approach that balances security and usability:
My Setup Overview
I use a combination of Cloudflare Tunnels and WireGuard VPN to solve different use cases:
- Cloudflare Tunnels: For easy family access (my mom uses Emby without any VPN setup)
- WireGuard VPN: For secure access to all my services when I’m away from home
The Technical Details
VPS Setup:
- Running wg-easy on a Hetzner VPS (referral link!) as my WireGuard server (around €3/month - ridiculously cheap for what you get!)
- This acts as the central hub for my VPN network
- You don’t have to use Hetzner specifically, but I chose them for their excellent price-to-performance ratio and reliability
Home Network:
- Raspberry Pi running three key services:
- Pi-hole: DNS server for ad-blocking and custom domain routing
- Nginx Proxy Manager: Reverse proxy for internal services
- WireGuard client: Connects to my Hetzner VPS
The Magic DNS Setup: Since my Raspberry Pi bridges both my home network and the WireGuard network, I configured Pi-hole to route custom domains internally:
# in /etc/pihole/pihole.toml
hosts = [
   "10.8.0.2 emby.my.domain",
   # other hosts for different services
]
In this configuration, 10.8.0.2 is the WireGuard IP of my Raspberry Pi, and emby.my.domain is the custom domain that gets routed to Nginx Proxy Manager running on that Pi.
How it Works:
- When I’m connected to my WireGuard VPN from anywhere in the world
- DNS requests for
emby.my.domainget routed to my Pi-hole - Pi-hole directs them to my Raspberry Pi’s WireGuard IP (10.8.0.2)
- Nginx Proxy Manager on the Pi routes the request to the actual YAMS service
- I get secure access to my entire YAMS setup!
Benefits of This Approach:
- Family-friendly: Cloudflare Tunnels for non-technical users
- Secure: WireGuard VPN for power users and admin access
- Flexible: Can access any service through custom domains
- Fast: Direct VPN connection with no third-party limitations
- Cost-effective: Total monthly cost is just a few euros for the VPS
Network Architecture Diagram
Here’s how my setup looks visually:
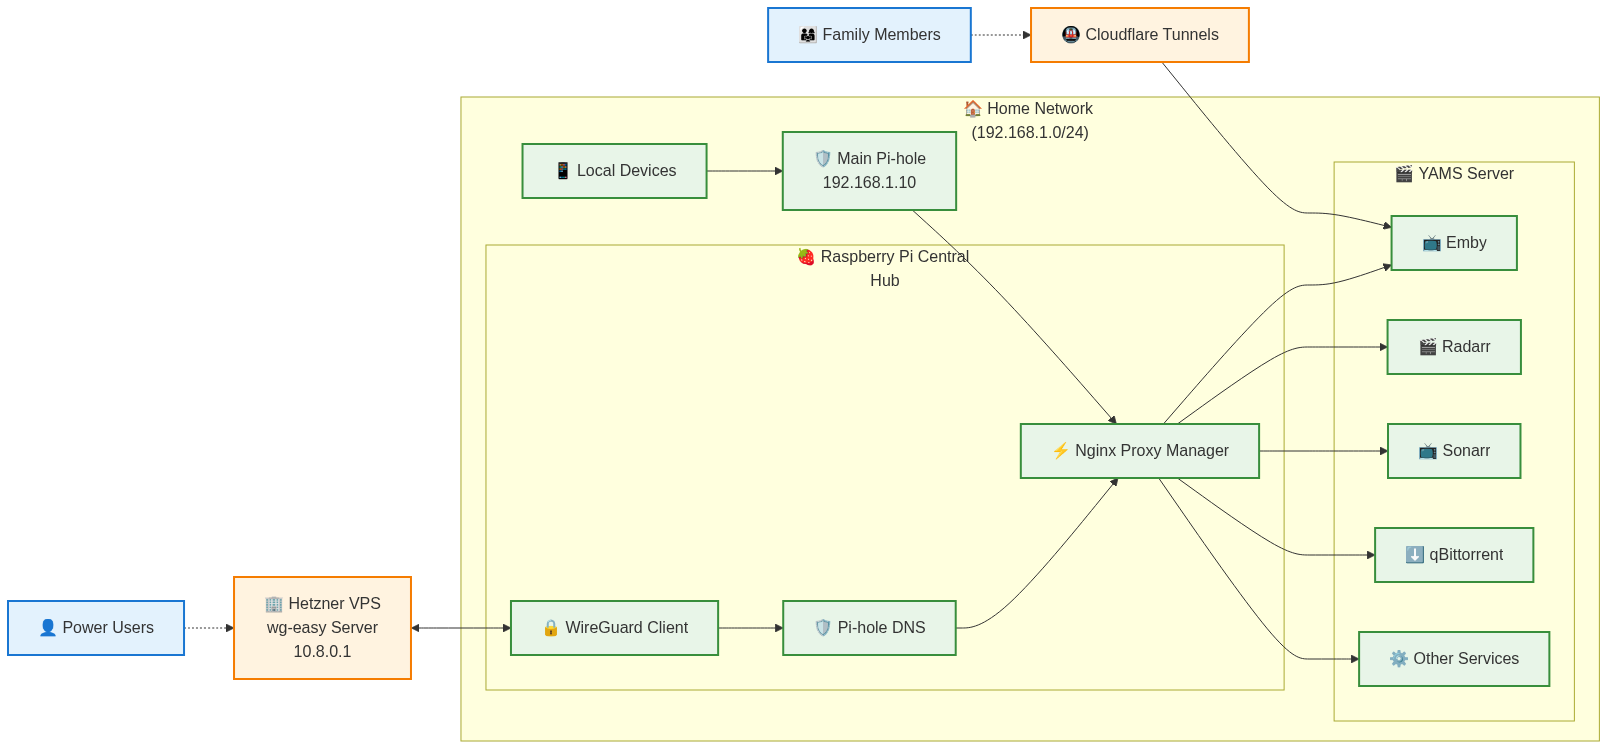
This setup gives me the best of both worlds - easy access for family members and secure, full control for myself when managing the server remotely.
Need Help? 🆘
This is advanced territory! If you’re determined to proceed:
- Start with the awesome lists linked above
- Consider asking for help in our Discord chat
- Remember: proceed at your own risk!
Remember: The safest server is one that’s not exposed to the internet at all! 🔒
Thanks to “Andy The Goat” on Discord for contributing to this guide!


