Seeding With Qui
ℹ️ This guide is a simpler to follow and more user-friendly version of the Seeding With qBitManage guide, using a newer app: Qui, instead of qBitManage. The concepts are very similar, but Qui has a much more user-friendly interface and setup process. If you are a true power-user and are looking for the utmost flexibility and customisation, the qBitManage guide is recommended instead!
In general, it is good practice to seed any torrents you download. Seeding is the act of sharing a media file you have downloaded with other users, helping with their downloads.
Many private trackers also require maintenance of a ‘ratio’. This ratio is calculating by the amount seeded over the amount downloaded, and must be maintained above a limit to ensure you are contributing to a tracker community.
Check out implemeting Autobrr into YAMS to further help your seeding!
Within a default YAMS setup, seeding is essentially not enabled once you have downloaded the file. However, if you already have the file downloaded, you might as well seed it to others right?
This is a guide on how to automate a flexible seeding setup within your media server:
- Once movies and shows are downloaded, they will be automatically seeded whilst the media remains within your server
- When media is watched from your streaming platform, it is deleted from within Radarr and Sonarr
- These now ’loose’ torrents are ensured to meet any minimum seeding requirements for your tracker, and then seamlessly deleted, freeing up your storage space!
Note that if previously have a cross seeding setup, this guide should not be followed word for word. Extra manipulation of the provided workflows may be necessary.
But what is meant by a ’loose’ torrent? Let’s explore the concept of hardlinking.
Hardlinking 🔗
Hardlinking is enabled in YAMS by default, and required for this guide to work, with no exceptions. To verify if hardlinking is enabled in your setup, ensure “Use Hardlinks instead of Copy” is enabled in Radarr’s Settings > Media Management (Show Advanced settings at the top left of the page) > Importing.
What is a Hardlink?
When you download a torrent, the file is downloaded into your YAMS torrent folder. Without hardlinking, when Radarr/Sonarr import this file, it would copy it to your server’s media directory - meaning you’d have two copies taking up double the storage space.
A hardlink is different, and it’s purpose is in the name: ’link’. Instead of copying the file, it creates a second reference to the same data on your disk. Think of there being two ’links’ on your disk, one in your torrents folder and one in your media folder, both pointing to the same data on disk.
This allows the file to essentially exist in two places in your media server, all whilst only taking up the storage space of one copy.
Why is this helpful?
With hardlinks enabled:
- qBitTorrent can continue seeding the torrent from the downloads folder
- Jellyfin/Plex can stream the same file from the library folder
Not only this, each ’link’ has equal ownership over the data on disk. This means that data will persist on the disk until ALL references to it are deleted, regardless of their order of creation.
In this guide, the deletion flow will be setup like this:
- After download, each media file should have 2 hardlinks. One for qBitTorrent (the original one!), and one for Radarr/Sonarr.
- qBitTorrent’s hardlink will be seeded indefinitely.
- After watching the media in Jellyfin/Plex, it will be deleted.
- Qui will detect the torrent file has no hardlink (only 1 reference to the file exits), and remove the torrent from qBitTorrent.
This allows maximum seeding whilst the media remains within your setup, but as soon as you are done watching, it cleans right up!
Lets get started into actually creating this setup.
Creating the Stack
Using a Deletion Tool
To set up this stack, a deletion tool should be used. This refers to any tool that deletes unwanted media from your Jellyfin/Plex libray.
You can use the Jellyfin plugin Media Cleaner which deletes watched movies/shows in Jellyfin after a specified amount of time. If you are using Jellyfin, this is a good option that doesn’t require running a seperate container.
If you wish to use another service, maybe to delete unwatched media too, please do. Do some research on the many Plex and Jellyfin tools available to clean up your libraries. Any tools that delete media will work, as long as they don’t mess with your torrents.
Setting up Qui 🛠️
Qui is an extremely handy web UI for qBitTorrent, but it also has powerful automation features. We will be using its automation features to monitor our torrents, and delete them when they are no longer needed.
Be sure to refer to Qui’s documentation if you want to explore further!
Docker Compose Entry
Add the following entry in your docker-compose.custom.yml file, below the services: parent item.
  qui:
    image: ghcr.io/autobrr/qui:latest
    container_name: qui
    restart: unless-stopped
    ports:
      - "7476:7476"
    environment:
      - PUID=${PUID}
      - PGID=${PGID}
      - TZ=${TZ}
    volumes:
      - ${INSTALL_DIRECTORY}/config/qui:/config
      # optional, but required for filesystem-enabled features like hardlink detection
      - ${MEDIA_DIRECTORY}/downloads/torrents:/data/downloads/torrents
Then, run yams start qui in your terminal to get it up and running! Access the web UI at http://your-server-ip:7476.
Connecting Qui to qBitTorrent 🔗
First, open up the Qui web UI, and create an new account. Make sure to save your login details!
Now, before we get started, lets make qBitTorrent allow connections from Qui by optionally bypassing authentication within the YAMS network. Jump over the this section from the YAMS docs and ensure in addition to your local IP, you also add a new line with the YAMS subnet:
172.60.0.0/24. Make sure to save, and then say goodbye to the qBitTorrent web UI - you might not need it again!
This bypass is safe only because qBitTorrent is running in your home server and not directly exposed to the internet. Do not use this if you expose qBitTorrent’s port externally.
You should see a ‘Dashboard’ page. From here, click on the ‘Add Instance’ button in the center.
Enter the following details:
- A name for the instance, e.g. ‘Server’
- Your qBitTorrent URL. If you are running qBitTorrent behind your vpn, its URL will be
http://gluetun:8081. Otherwise, it will behttp://qbittorrent:8081. - Turn on ‘Local Filesystem Access’ - this is required for hardlink detection to work.
- If you added the YAMS subnet to qBitTorrent’s web UI settings, you can turn off authentication by toggling ‘Bypass Authentication’. If not, enter your qBitTorrent username and password.
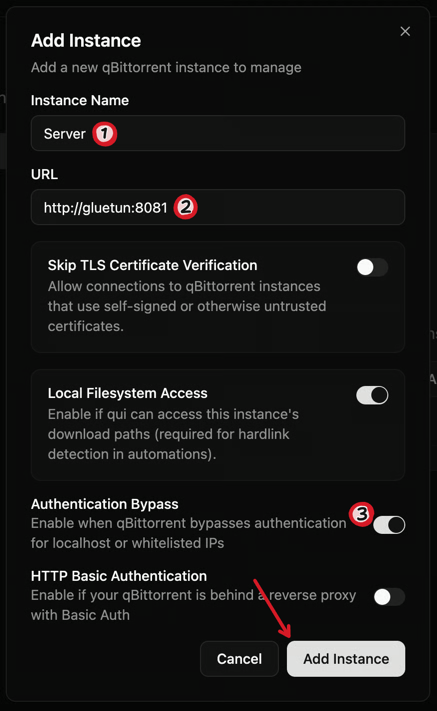
Then, hit ‘Add Instance’! In the sidebar, you should now see your qBitTorrent instance listed. Click on it to connect, and you should see your torrents load up.
This is your main Qui interface, equivalent to the qBitTorrent web UI. Save this URL for later if you ever want quick access!
Disabling Auto Remove in Radarr/Sonarr
Radarr and Sonarr both have built in features that can automatically remove stopped torrents they have imported. We DO NOT want this enabled, as it will unexpectedly and silently interfere with any workflows we may create.
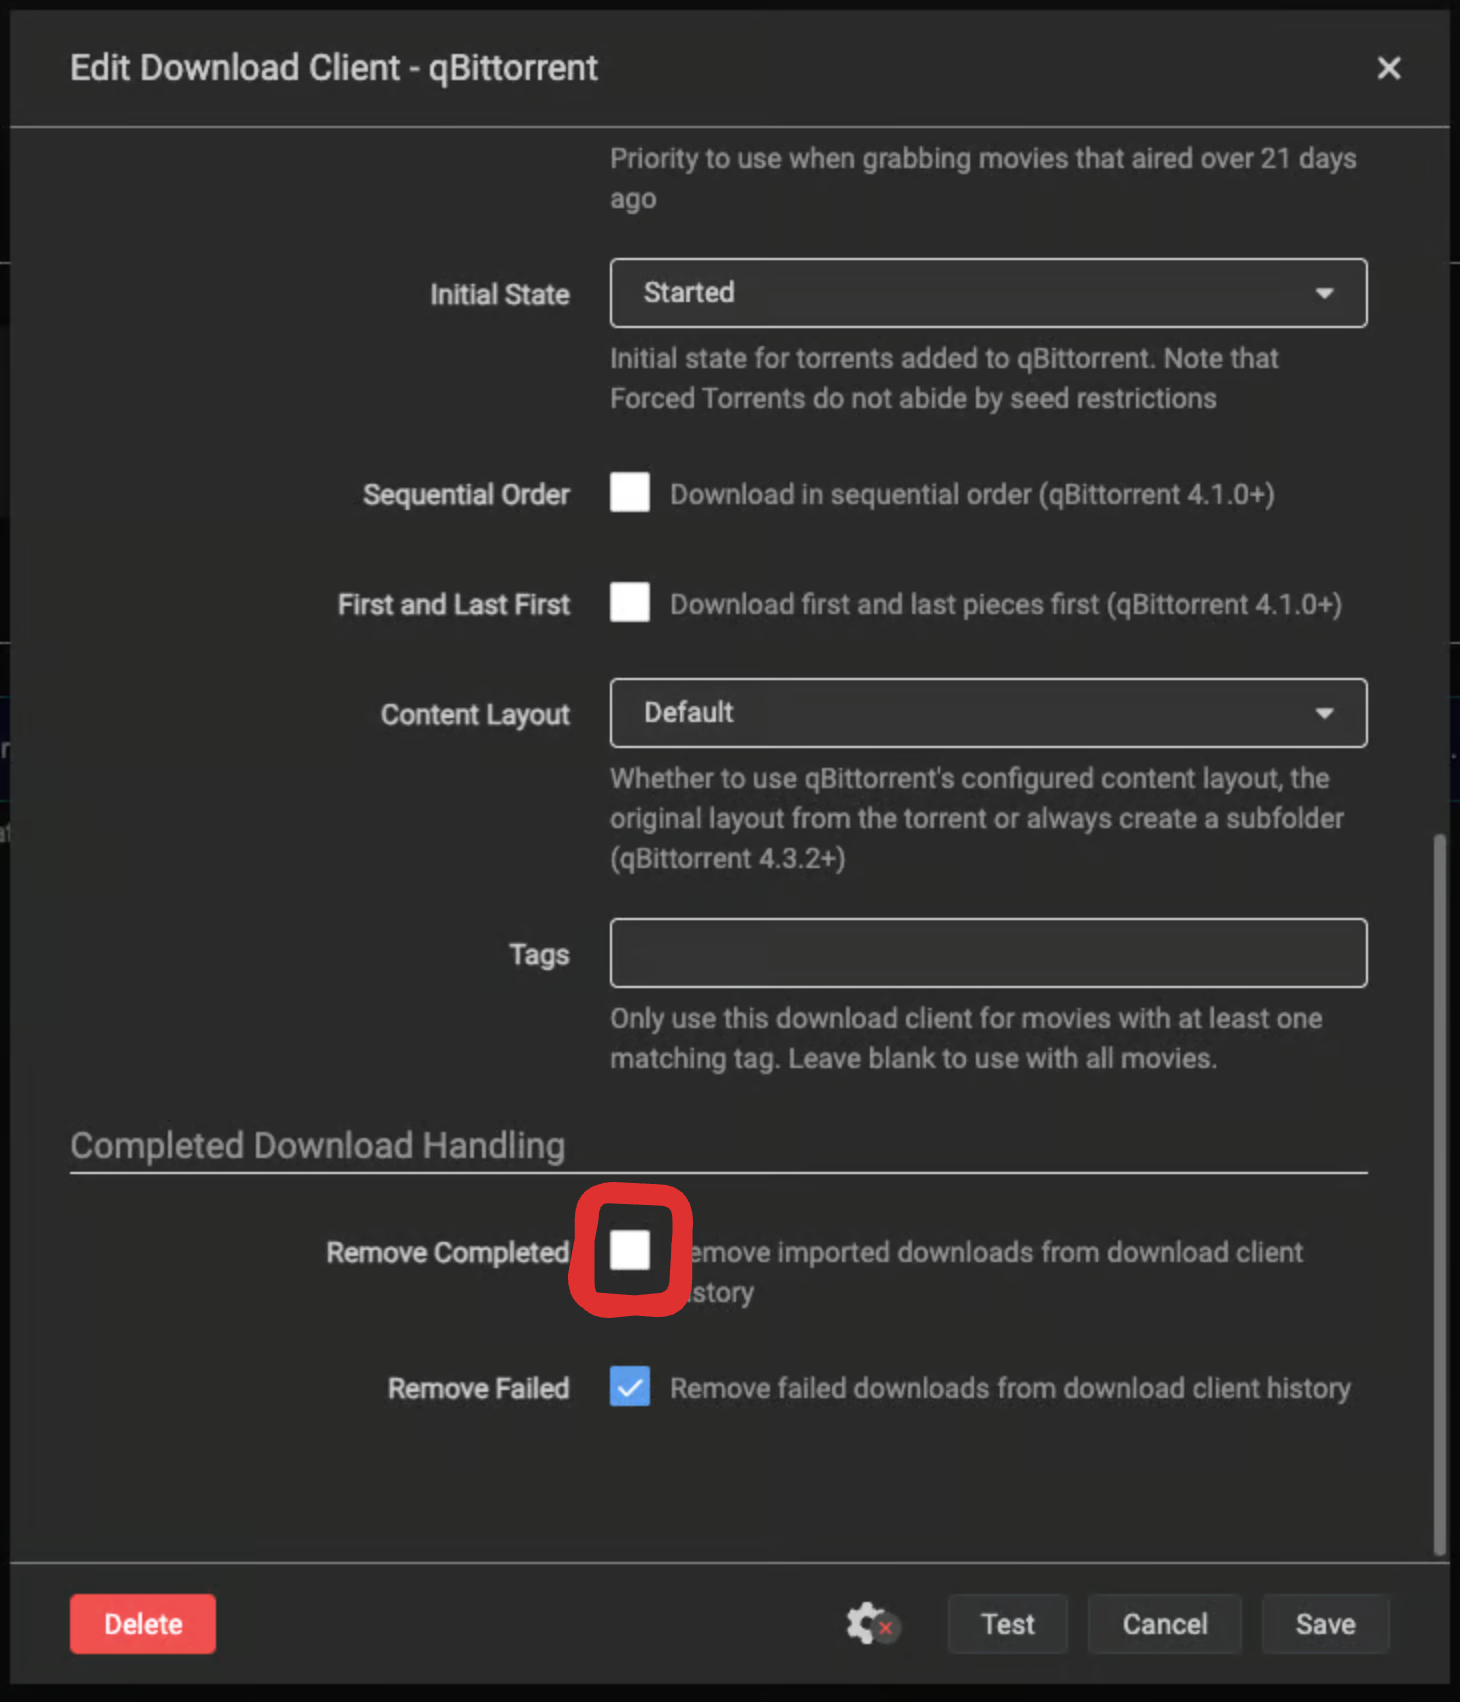
Navigate to Radarr and Sonarr’s settings > ‘Download Clients’ section > qBitTorrent > ensure the ‘Remove Completed’ checkbox at the bottom is disabled. Do this in both Radarr and Sonarr.
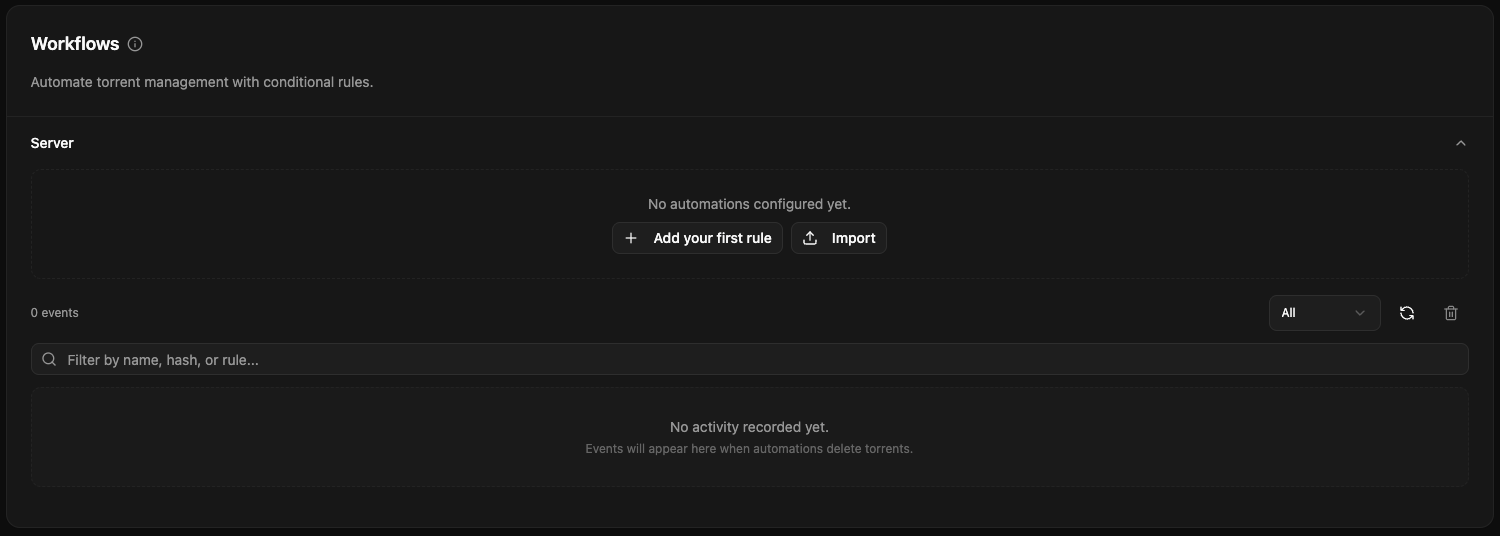
Setting up Automations ⚙️
Now, navigate to the ‘Automations’ tab in the sidebar.
Understanding the Workflow Builder
Workflows in Qui have three main sections:
- Trackers: What trackers’ torrents the automation will apply to. This is useful if you want to only apply this seeding setup to certain trackers, e.g. only private ones.
- Conditions: What conditions must be met for the action to be taken. It acts as a filter, ensuring the action is only taken on torrents that meet certain criteria, e.g. only movies, or only files without any hardlinks.
- Actions: What actions to perform when the conditions are met. This action is taken on every torrent that matches the conditions, e.g. tag the torrent with a specific tag.
Finally, for each workflow you specify how often you want it to run. This is how often Qui will check your torrents for matches to the workflow, and perform the specified action on them.
Creating a Workflow
In order to create our seeding setup, we will have to split our wanted automation into 5 separated workflows. This makes it easier to determine which part of the workflow is not working if something goes wrong, and also allows for more flexibility in the future if you want to change part of the workflow.
Tags will be used to link the workflows together and provide visual cues if you ever want to manually debug, so make sure to use unique tags that aren’t used by any other workflow!
The workflows we will create are as follows:
- A workflow to tag non-hardlinked torrents with a
noHLtag. - A workflow to apply seeding requirements (through qBitTorrent ’limits’) to
noHLtagged torrents. - A workflow to determine if
noHLtorrents have met their seeding requirements, if not, tag them with aseedingRequiredtag. - A workflow to
retire(stop) torrents tagged withseedingRequiredthat have met their seeding requirements. - A workflow to delete retired torrents after 7 days of being stopped.
Lets say a torrent is downloaded from a private tracker with a 7 day seeding requirement, and is deleted from the media library after 3 days. The workflow will work like this:
- The torrent is tagged with
noHLas it has no hardlink (the media file only has 1 reference on disk, the one in the downloads folder). - The torrent will have a 7-day seeding limit applied to it. It will be tagged with
seedingRequireduntil it has seeded for 7 days. - After seeding for 7 days, the torrent will be tagged with
retiredand stopped, and theseedingRequiredtag will be removed. - The torrent will be fully deleted 7 days after being stopped.
Torrents are kept in qBitTorrent for 7 days after being stopped to ensure that upon any issues (e.g an accidental hit and run on a private tracker), you have a week to fix the issue and manually re-enable seeding before the torrent is deleted. This is a safety net, but feel free to change this time frame if you want!
Workflow 1: Tagging non-hardlinked torrents
Optional manual import link here.
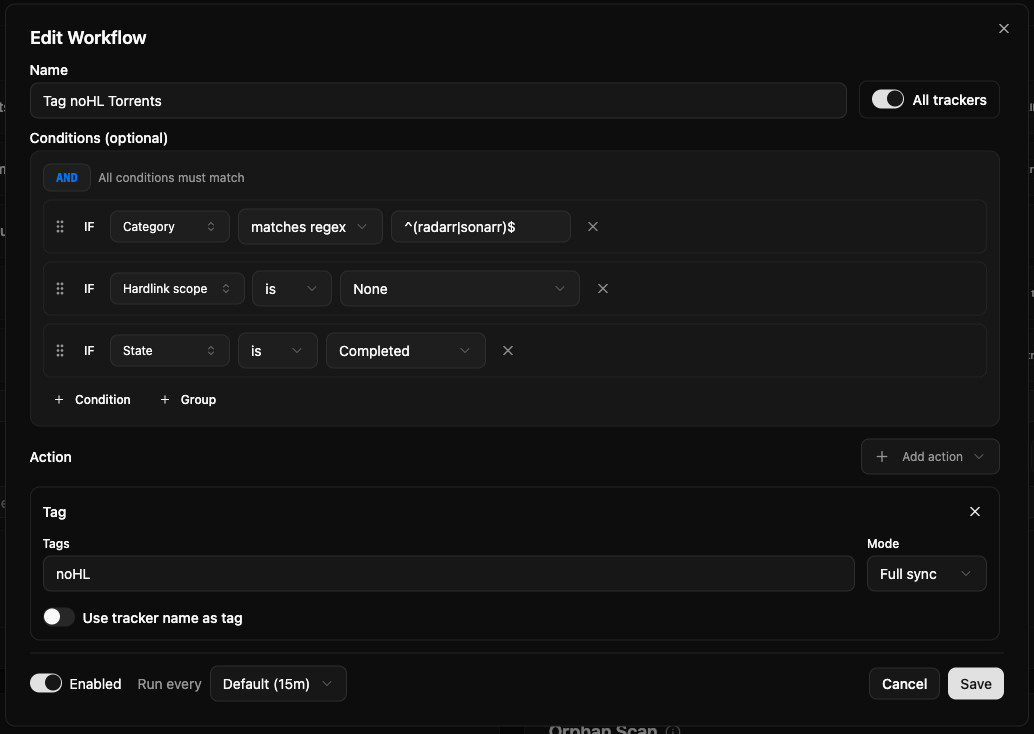
Create a new rule, and name the workflow ‘Tag noHL Torrents’.
Add a condition that uses regex to only apply to the radarr and sonarr categories. This ensures that this workflow only applies to media torrents, and not any other torrents you might have in your setup.
Add a second condition that checks if the hardlink scope is ‘None’.
Add a third condition that checks the state is ‘Completed’, to ensure only fully downloaded torrents are tagged.
Finally, add an action to tag the torrent with noHL, and save.
Workflow 2: Applying seeding requirements
Optional manual import link here.
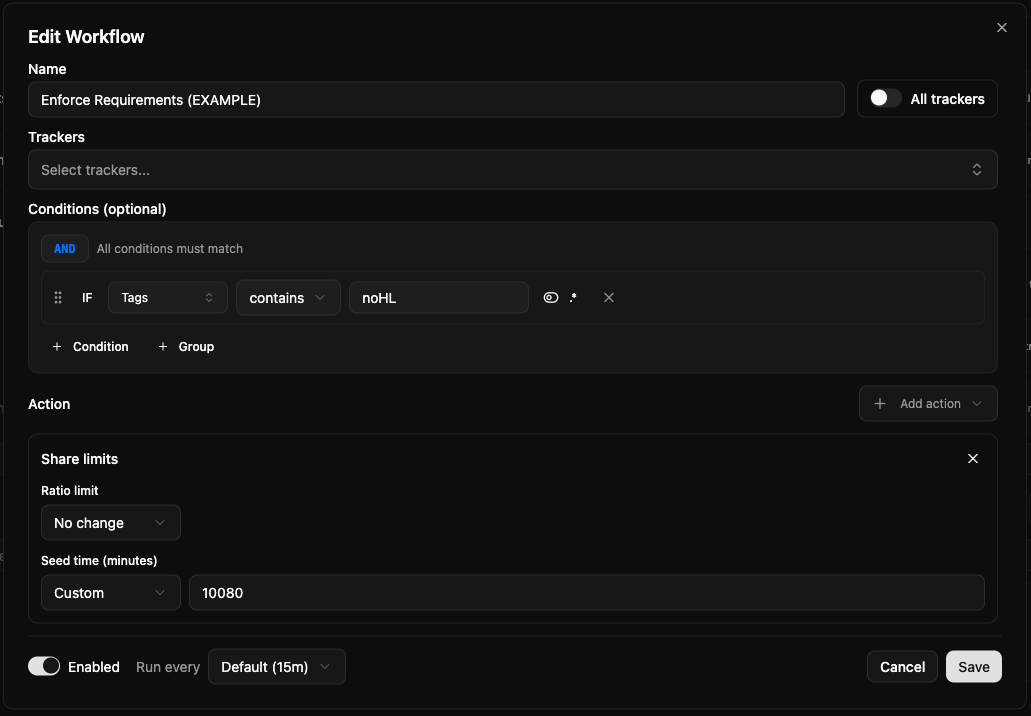
Create a new rule, and name the workflow ‘Enforce Seeding Requirements (TRACKER NAME)’. This is the workflow that will enforce seeding requirements for torrents from a specific tracker, so make sure to specify the tracker in the name.
One of these should be added for each tracker you download from with different seeding requirements.
In the trackers section, select the tracker(s) this workflow will apply to. This ensures that only torrents from this tracker will have seeding requirements applied to them.
Add a condition that checks if the torrent is tagged with noHL, using the tags contains operator.
Finally, add an action to set a seeding time or ratio limit on the torrent. This is done by selecting ‘Set Limit’ as the action type, and then setting the seeding time limit to match the seeding requirements of your tracker, e.g 7 days (make sure to enter it in minutes!). Save the workflow, and repeat this process for each tracker you download from with different seeding requirements.
It can be a good idea to enter in a value slightly more than the actual seeding requirement, to account for any small discrepancies in time tracking.
Workflow 3: Tagging torrents that haven’t met seeding requirements
Optional manual import link here.
Create a new rule, apply it to all trackers, and name the workflow ‘Tag Seeding Required’.
Add a condition that checks if the torrent is tagged with noHL, using the tags contains operator.
Add a second condition that checks if the torrent’s state is ‘Running’, to ensure only actively seeding torrents are tagged.
Add an action to tag the torrent with seedingRequired, and save.
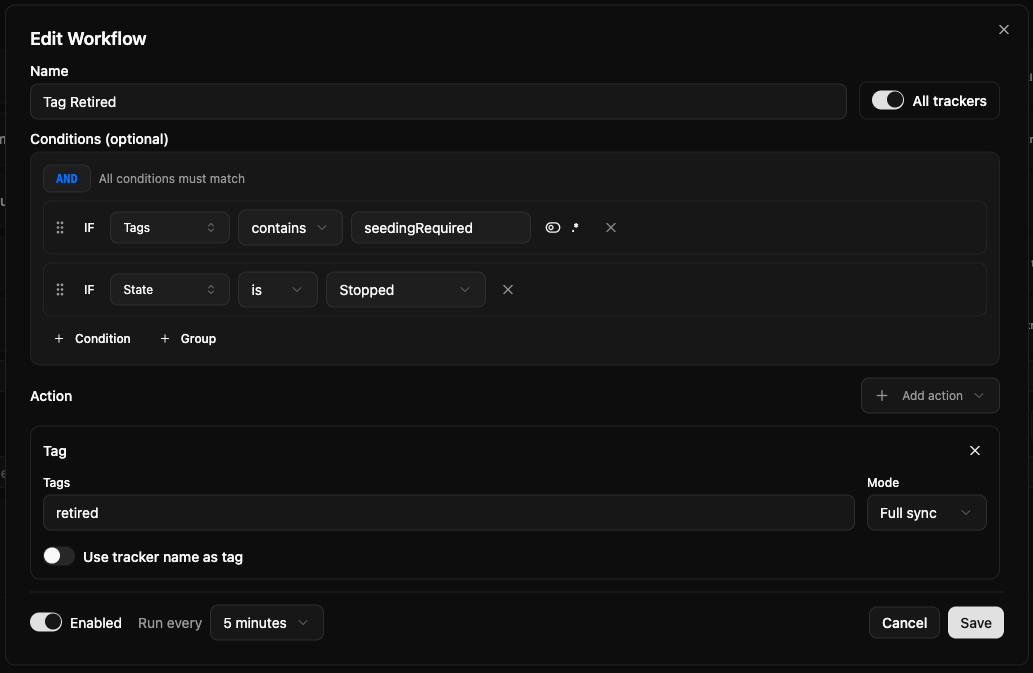
Workflow 4: Retiring torrents that have met seeding requirements
Optional manual import link here.
Create a new rule, apply it to all trackers, and name the workflow ‘Tag Retired’.
Add a condition that checks if the torrent is tagged with seedingRequired, using the tags contains operator.
Add a second condition that checks if the torrent’s state is ‘Stopped’, to ensure only torrents that have met their seeding requirements ()and thus been stopped by qBitTorrent are tagged.
Add an action to tag the torrent with retired, and save.
Workflow 5: Deleting retired torrents after 7 days
Optional manual import link here.
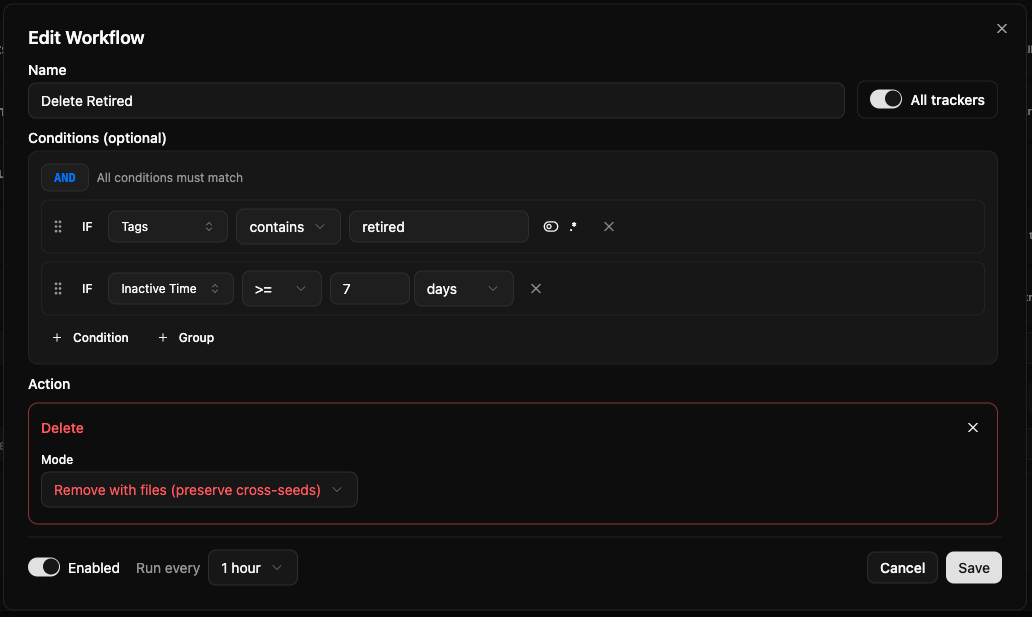
Create a new rule, apply it to all trackers, and name the workflow ‘Delete Retired’.
Add a condition that checks if the torrent is tagged with retired, using the tags contains operator.
Add a second condition that checks if the torrent’s inactive time is greater than 7 days.
Add an action to delete the torrent with files (preserve cross-seeds), and save.
And that’s it! You now have a fully automated seeding setup that ensures you are always seeding your media files until you are done with them, at which point they are seamlessly removed from your server after meeting any seeding requirements.
The state of all of your torrents can be easily monitored through the tags applied to them, and you can easily adjust any part of the workflow in Qui’s interface if you want to change how it works in the future. In addition, Qui’s automation menu has a log of all automation actions taken, so if you ever want to check what’s happening to your torrents, you can easily check the log to see what actions have been taken on them and why.
What’s more, the new Qui app can fully replace qBitTorrent’s web UI, so you can manage your torrents from there going forward if you like the interface!
Be sure to keep checking in on your system every so often to ensure it is working as expected!
Thanks to not-first on Github for contributing to this guide!


